When I Upload Photos to Lightroom Where Do They Go
For those new to the software, the process of importing photos into Lightroom tin can be somewhat mysterious.
Information technology's non uncommon for people to unwittingly make multiple catalogues, duplicate their photos, lose track of where they're sending their images or, in extreme cases, delete them.
Information technology'southward therefore very important to understand exactly what the import process does from the beginning.


What is Importing?
Y'all may take heard people talking virtually 'importing photos into Lightroom' equally if they're somehow adding the images themselves to Lightroom.
This is not actually the instance.
In essence, importing your photos boils downwards to telling Lightroom where they are in your storage.
The location of your photos and photographic camera-generated EXIF data (shutter speed, discontinuity, fourth dimension and engagement, etc.) are all entered into Lightroom's catalogue. It'southward rather like filling in an former style index card for a new book in a library.
You cannot edit any photos in Lightroom until you've first imported them. This is done from the Library Module.
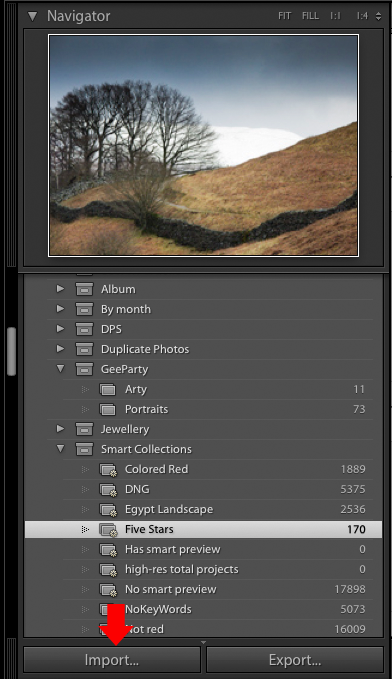
Check that the Library Module has been selected in the top module selection strip. If you can't meet it, click the little pointer at the top centre. Information technology should await like this:

On the left-hand side of the screen, you should see a pane containing several other panels and, at the bottom of this, you should see the 'Import' button. If this pane is not visible, just tap the TAB key and it should appear as follows:
Importing from a Camera
To import pictures from your photographic camera, connect it to your computer using a USB cable (there's no need to use a card reader or other special software). Switch the camera on and click the Import button to bring up the import dialogue box:
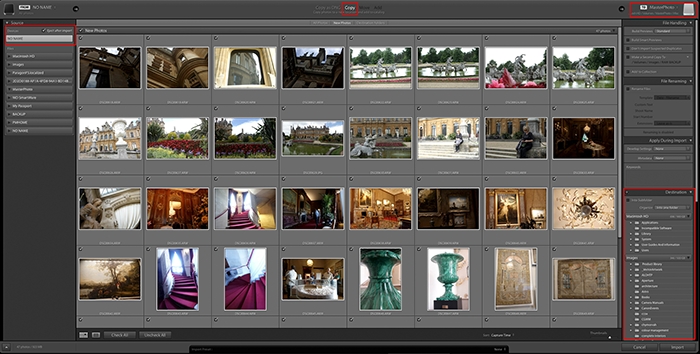
The layout of this dialogue box is very logical—you merely suit the settings in the windows from left to right and then hitting the Import button.
The Left Window
This shows you the diverse places from which you can import photos. It will prove all connected difficult drives, memory cards and cameras.
Your camera should appear in the list (it may show upward with as your photographic camera'southward model name or it may just be called 'NO NAME').
Click the item corresponding to your camera and you should see the thumbnails begin to announced in the eye window, which is the main role of the screen.
The Centre Window
The images stored on your camera volition appear as thumbnails in the primary area of the screen.
Untick whatever that you don't want to import. If any photos appear greyed out, this indicates that Lightroom thinks y'all've already imported them.
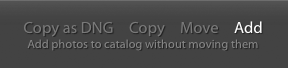
The selection at the top eye of this screen is very important.
Lightroom will usually select the correct pick; this doesn't always happen, so it pays to check this. There are four options: 'Copy as DNG', 'Copy', 'Move' and 'Add'.
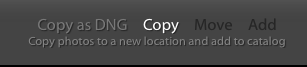
When importing images into Lightroom from a camera's media card, you need to re-create the photos to your computer's hard drive so that you lot can reuse your retentivity card.
- 'Copy' will re-create each of the selected images as-is
- 'Copy equally DNG' will convert any RAW files information technology finds on the card into the Adobe Digital Negative format, and and so save them. This takes a little longer only information technology's a good format to utilise for archival purposes and it takes slightly less hard drive space.
The 'Motion' and 'Add together' options should not be bachelor but they tin can sometimes be—but check that 'Add' has not been selected otherwise you lot volition not exist able to edit the photos later.
The Right Window
The destination to which your photos will be copied is displayed just higher up this console.
This tin can be whatsoever drive, either the computer'southward own internal difficult drive or an external USB drive. Many people choose to take a general purpose binder on their chosen drive to which they import all their images.
Select the destination folder past clicking the top right expanse to see a list of recent destinations or click on a folder from the Destination panel at the bottom of the window.
If you want to create a new folder to which the photos will be copied, click the '+' button at the very top of the Destination console.
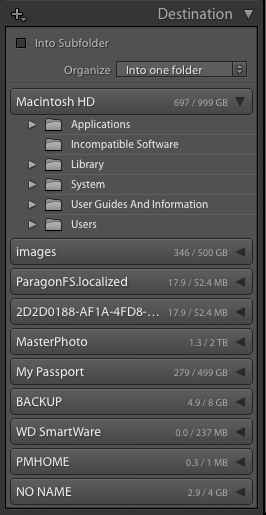
Some people discover that later on importing photos into Lightroom they have loads of unwanted sub-folders named by date, with merely a few photos in each i.
This is because the 'Organize' drop-downward box in the Destination panel was set to 'By Date' instead of 'Into one folder' as shown to a higher place.
If you want to identify your photos into a new subfolder, you can tick the 'Into Subfolder' box and supply a suitable name.
Import Options
Lightroom allows yous to perform a number of useful tasks. You can apply these as photos are copied to your computer and added to the catalogue.
File Handling
Options for how each imported file is handled are listed in the 'File Handling' window.
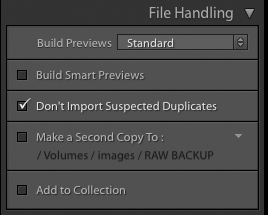
Here'south a rundown of what each of these options practice:
Build Previews
In order to display thumbnail photos in the various Lightroom modules, information technology's necessary to build previews of each photo.
This happens during the import process. You tin use the drop-down box in this panel to choose from three types of previews (other than the Standard preview). These previews differ by quality and are as follows:
- Standard – This is the default preview. Standard uses the Photographic camera Raw engine for processing and so sometimes appear different from minimal or embedded previews.
- Minimal – This preview produces depression resolution camera-generated JPEG images that are very fast to create simply not colour managed.
- Embedded & Sidecar – These are larger camera-generated previews that take a niggling longer to create than minimal previews.
- ane:one – These are full-sized images that Lightroom uses when you zoom into an image.
- When you lot tell Lightroom to generate ane:1 previews, it as well generates minimal and standard previews, then that all three are available as the software requires. Full-sized previews can take a long time to generate and make the import process very tiresome.
Build Smart Previews
If you have your main photos e'er available to the catalogue, y'all can leave the 'Build Smart Previews' box unticked.
If you want to edit your photos when the master images are not online (when the external USB bulldoze on which they reside has been unplugged, for case), Smart Previews allow you to brand edits with missing master photos.
But if you don't intend to exercise this, go out the box unticked. Smart Previews volition accept up extra space on your hard drive. You lot can brand a Smart Preview hands later on if yous need to.
Don't Import Suspected Duplicates
Sometimes photos are left on a media carte du jour between import sessions, from ane shoot to the adjacent.
This tin can make it difficult since some photos on the card will exist new and some volition accept already been imported to Lightroom.
In cases like this, it's possible that the same photo will be copied to more than 1 place on your hard drive, which ends up getting messy when importing.
To help avoid this happening, tick the 'Don't Import Suspected Indistinguishable' box.
Lightroom volition then check the EXIF data for each photo confronting those it already knows nigh and gray out any information technology thinks you already have in the catalogue.
Ideally, you should import all the images on a card, and once safely copied to your hard drive, the media menu should be re-formatted ready for the next shoot. However, non everyone does this, based on personal preference and addiction.
So fifty-fifty if you always reformat your cards, it's more often than not a adept idea to tick this box as it volition assistance keep things tidy.
Make a Second Re-create To:
You don't desire random duplicates of some of your photos, merely you should have comprehensive dorsum-ups.
All hard drives will fail somewhen so having access to a re-create of each photograph is a good insurance against adventitious deletion or hardware failure.
The best system is to have a proper incremental back-upwardly procedure in place using proprietary fill-in software. However, if you don't savour this level of protection, Lightroom does offer some kind of solution.
If you tick the 'Make a 2nd Re-create To:' box, you can specify another hard drive folder to which Lightroom volition copy your photos during import.
This saves yous from remembering to support your photos but it doesn't allow you to rename any photos during the process. It's only a direct copy of what happened to be on the camera's media bill of fare—rough just better than nothing.
Add to Collection
If you tick this box, Lightroom can automatically add all the photos you lot're importing and then to an existing drove.
File Renaming
If you lot're trying to import photos from several different cameras, you'll quickly discover that the chances of having ii or more photos with the aforementioned file name is quite high.
Because of this, it's useful to be able to rename the rather cryptic file names your camera generates to more than recognisable and unique names.
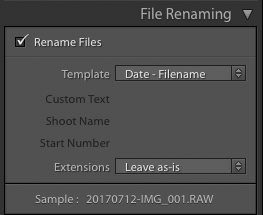
To do this, just tick the 'Rename Files' box and select a template from the drop-downward box. In the example above, the template called adds the appointment to the front of the filename provided by the camera.
If y'all're using several cameras on the aforementioned shoot, you lot might instead want to select a template that includes a custom name for a particular photographic camera.
There are lots from which to cull just if aught suits your way of working, y'all can opt to make your own template by selecting 'Edit'.
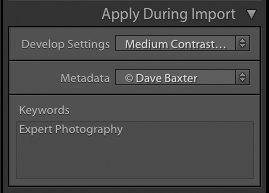
Use During Import
This import option allows you lot to add additional information (metadata) to your photo files.
A handy tip is to use the 'Employ During Import' panel to add a copyright in the metadata for each paradigm imported.
If you've already found some develop adjustments you like and yous've saved them every bit a preset, select this or any other preset from the Develop Settings drop-downwardly box. Lightroom will then apply those settings to each imported photograph.
This panel too allows y'all to add keywords to assistance you with the task of organising photos in Lightroom.
Salvage Your Import Settings
Finally, at the bottom of the import screen, at that place's an option to save your import settings as a named preset—merely click on the arrows and select 'Save Current Settings as New Preset…'
How to Import From A Hard Bulldoze
Importing from a difficult drive is simple. Lightroom merely needs to know where the photos are already located.
There is no need to copy or rename them, only information technology'southward all likewise easy to brand adventitious copies if you don't carefully picket the settings.
Follow these steps when importing from a hard drive:
- In the Source panel, select the folder whose photos yous want to import. If it contains subfolders, be sure to tick the 'Include Subfolders' box in order to see thumbnails of the photos in this binder and all its subfolders.
- Make sure you select 'Add' and not 'Re-create'. This volition exit the photos in their electric current folders and volition avoid making duplicates.
- Set the options under File Handling as for doing a camera import. Annotation that making a 2d copy is greyed-out with the Add option.
- Nether 'Utilize During Import' set as per the camera import.
Source: https://expertphotography.com/how-to-import-photos-into-lightroom-a-beginners-guide/
0 Response to "When I Upload Photos to Lightroom Where Do They Go"
Postar um comentário